
How to Create a Donation Website with ReactJS, Sanity, and BudPay: A Step-by-Step Guide


When it comes to raising funds for your cause, donation websites are an incredible asset. They provide a convenient and efficient way for you to accept contributions from individuals around the globe.
If you're looking to create a donation website, using ReactJS, Sanity, and BudPay can be an excellent choice. In this article, I'll demonstrate how to build a donation website using ReactJS, Sanity, and BudPay in this article. Together, these three technologies produce a strong and adaptable platform for developing donation websites.
Here's a sneak peek of what we'll be building: a captivating and fully functional donation website. Get ready to witness the power of ReactJS, Sanity, and BudPay in action!
https://donationn-site.netlify.app/
Sanity
In order to seamlessly manage the content and data of your donation website, we'll be incorporating Sanity, a versatile headless content management system (CMS).
With Sanity, you'll have the power to effortlessly create and organize various elements of your website, such as donation campaigns, testimonials, blog posts, and more.
Its flexible and customizable features ensure that you have full control over your website's content management, enabling you to deliver a dynamic and engaging user experience.
BudPay
One of the critical aspects of any donation website is the secure handling of financial transactions. This is where BudPay, a trusted payment gateway, comes into play.
As a trusted payment gateway, BudPay provides a secure platform that ensures the seamless processing of payments. With BudPay, you can rest assured that your donors' sensitive information is safeguarded, guaranteeing privacy and safety throughout the transaction process.
By integrating BudPay into your donation website, you create a trustworthy and convenient payment experience for your valued donors.
You can offer a variety of payment options, by integrating BudPay with your ReactJS donation website and catering to a wide range of donor preferences.
Getting Started With Sanity
In this portion of this article, we are going to be seeing how we can set up sanity on our local machine. By following the step-by-step instructions provided, you will be able to establish a local environment for Sanity.
Step 1: Install The sanity Command Line Interface (CLI)
The Sanity CLI is a collection of tools for managing, developing, debugging, and deploying your Sanity Studio projects as well as running scripts to migrate or manipulate your data.
The sanity CLI will allow you to scaffold new projects directly from the command line.
Using either npm or yarn, we can install sanity CLI, but this tutorial will use npm.
Open any terminal of your choice and run the following command to install The sanity CLI:
npm install --global sanity@latest
Step 2: Create a New Project
Make a new folder and give it any name you choose; for the purposes of this lesson, I'll call mine donation. After that, cd into the folder you just made and run the following command:
sanity init
A new Sanity project will be launched using the command above. A separate email address and password can also be used to log in if you don't want to use your Google or GitHub login information. On the other hand, if you already have an account and are logged in, you would see something like this:
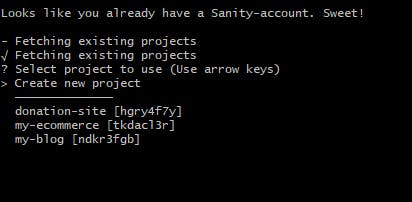
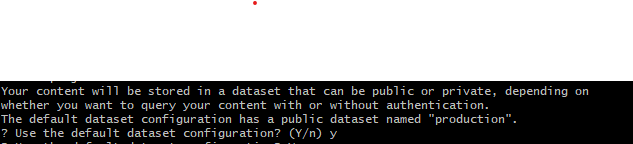
If this is your first project, pick Create a new project, then give it a name. Next, you'll be asked if you want to utilize the tutorial's default dataset settings. I do, so I'll pick yes:
After that, Sanity will prompt you to select a template and your project output directory. I utilized a blog project template for this instruction. Sanity will then install all dependencies before directing you to the next path, where you can begin working on the project.
Now in your backend folder navigate to schemas and in the post.js file add this content to define a description field:
 defineField({
      name: 'description',
      title: 'description',
      type: 'string',
    }),
Step 3: Adding Content to Sanity
To run your sanity studio type in the following:
npm run dev
Now navigate to http://localhost:3333/ on your browser to view your sanity backend and you should see something like this:

The addition and deletion of contents can be controlled from the sanity backend, as seen in the image above where I have added things to my sanity. Let's create the front end now.
Building the frontend
We'll be using React to create the website's front end in this section of the article.
Step 1: Create a New React App
In this tutorial, we'll use Vite to create a brand-new React project.
Launch whichever terminal you choose to use and enter the following command:
npm create vite@latest
After getting the name of your project, Vite will ask if you want to use React or another library; select React.
Once the command has finished, cd into the app and type the following command into the terminal:
npm install
npm run dev
Step 2: Installing Necessary dependencies
You will require some dependencies to create the app more rapidly.
With the help of Tailwindcss, we will be able to quickly and easily develop beautiful UIs. To install Tailwindcss, type in the following command:
npm install -D tailwindcss
npx tailwindcss init
At the root of your react app, create a tailwind.config.js and add the following snippet to this file:
/** @type {import('tailwindcss').Config} */
module.exports = {
  content: ["./src/**/*.{html,js}"],
  theme: {
    extend: {},
  },
  plugins: [],
}
Next, clear your index.css file and add the following:
@tailwind base;
@tailwind components;
@tailwind utilities;
You can now use Tailwindcss in your React app. Two other necessary dependencies that will be installed are the react-router-dom for routing pages and @sanity/client for pulling data from our sanity backend. Run the command below to install them:
npm install react-router-dom @sanity/client
Step 3: Integrate React with Sanity
This is where it gets interesting. Create a new client.js file at the root of your app and paste the following:
import {createClient} from '@sanity/client'

export default createClient({
  projectId: "your-project-id",
  dataset: "production",
  useCdn: true,
  apiVersion: "2022-03-08"
})
The values for projectId and dataset should be the same as those you'll find in your sanity.config.js file in the sanity backend folder.
Now lets add a CORS origin via the management console:
Pick your project from the list
Go to Settings, and then to API settings
Under CORS Origins, click the Add CORS origin button
Enter your Origin, select whether or not to Allow credentials, and click Save. If your origin was added successfully, it will appear at the top of your CORS origins list.
Step 4: Building the Frontend Components
In this section of this article, we will build the component for our app. I have only created two components for this project and they are the Navbar.jsx and Footer.jsx
Navbar.jsx: Make a new folder in thesrcdirectory and call itcomponent. Then within thecomponentfolder, make a newNavbar.jsxfile and add the following content:import React from "react"; import { Link } from "react-router-dom"; const Navbar = () => { return ( <nav> <div className="max-w-screen-xl flex flex-wrap items-center justify-between mx-auto p-4"> <a href="#" className="flex items-center"> {/* <img src={Vector} className="h-4 w-4" alt="Elecar Logo" /> */} <Link to="/" className="self-center text-base font-medium ml-2 text-black " > HopefulGiving </Link> </a> <button data-collapse-toggle="navbar-default" type="button" className="inline-flex items-center p-2 ml-3 text-sm text-gray-500 rounded-lg md:hidden hover:bg-gray-100 focus:outline-none focus:ring-2 focus:ring-gray-200 dark:text-gray-400 dark:hover:bg-gray-900 dark:focus:ring-gray-600" aria-controls="navbar-default" aria-expanded="false" > <span className="sr-only">Open main menu</span> <svg className="w-6 h-6" aria-hidden="true" fill="currentColor" viewBox="0 0 20 20" xmlns="http://www.w3.org/2000/svg" > <path fill-rule="evenodd" d="M3 5a1 1 0 011-1h12a1 1 0 110 2H4a1 1 0 01-1-1zM3 10a1 1 0 011-1h12a1 1 0 110 2H4a1 1 0 01-1-1zM3 15a1 1 0 011-1h12a1 1 0 110 2H4a1 1 0 01-1-1z" clip-rule="evenodd" ></path> </svg> </button> <div className="hidden w-full md:block md:w-auto" id="navbar-default"> <ul className="font-medium flex flex-col p-4 md:p-0 mt-4 border rounded-lg md:flex-row md:space-x-8 md:mt-0 md:border-0"> <li> <Link to="/" className="block py-2 pl-3 pr-4 text-base hover:text-blue-900 rounded md:bg-transparent text-black " aria-current="page" > Home </Link> </li> <li> <Link to="donation-list" className="block py-2 pl-3 pr-4 text-base hover:text-blue-900 rounded md:bg-transparent text-gray-900 " aria-current="page" > Donation Needs </Link> </li> <li> <a href="#" className="block py-2 pl-3 pr-4 text-base hover:text-blue-900 rounded md:bg-transparent text-black " aria-current="page" > Faq </a> </li> <li> <a href="#" className="block py-2 pl-3 pr-4 text-base hover:text-blue-900 rounded md:bg-transparent text-black " aria-current="page" > About </a> </li> </ul> </div> </div> </nav> ); }; export default Navbar;
Footer.jsx: In the component folder create a new Footer.jsx file and add the following content:
import React from 'react'

const Footer = () => {
  return (
    <div
    className='w-full flex justify-around lg:flex-row flex-col items-start lg:items-center ml-4 lg:ml-0 lg:mt-0 mt-40'
    style={{height: "18.188rem"}}
    >
        <div className='lg:-mt-8 mb-12'>
        <div className='flex items-center mb-4'>
              <h3 className="self-center ml-2 text-xl font-semibold text-black mr-24">HopefulGiving</h3>
     </div>
     <div>
        <p className='text-sm font-normal text-black'>Make a difference today</p>
        <p className='text-sm font-normal text-black'>Donate to a better future</p>
        <p className='text-sm font-normal text-black'>Renowned Global Brands.</p>
     </div>
        </div>

        <div className='mb-12'>
        <div className='flex items-center mb-4'>
            <h3 className='text-xl font-semibold text-white'>Company</h3>
     </div>
     <div>
        <p className='text-sm font-normal mb-1'>About</p>
        <p className='text-sm font-normal mb-1'>Donation</p>
        <p className='text-sm font-normal mb-1'>History</p>
        <p className='text-sm font-normal mb-1'>Mission</p>
     </div>
        </div>


        <div className='mb-12'>
        <div className='flex items-center mb-4'>
            <h3 className='text-xl font-semibold text-white'>Information</h3>
     </div>
     <div>
        <p className='text-sm font-normal mb-1'>Request a Quote</p>
        <p className='text-sm font-normal mb-1'>Home</p>
        <p className='text-sm font-normal mb-1'>Contact us</p>
        <p className='text-sm font-normal mb-1'>Services</p>
     </div>
        </div>

     <div>

     </div>
    </div>
  )
}

export default Footer;
Step 5: Building the Frontend Pages
Here we'll create three pages: Home.jsx , this page will contain information about what our donation site is about. DonationList.jsx to contain a list of urgent donations needs and the Donate.jsx page where the actual donation will take place.
Home.jsx: Make a new folder in thesrcdirectory and call itpages. Then within thepagesfolder, create a newHome.jsxfile and add the following content:import { useState, useEffect } from "react"; import HeroImg from "../assets/images/img-1.png"; import WhatWeDoImg from "../assets/images/img-2.jpeg"; import client from "../../client"; import { Link } from "react-router-dom"; const Home = () => { const [posts, setPosts] = useState([]); useEffect(() => { client .fetch( `*[_type == "post"] { title, slug, description, publishedAt, mainImage { asset -> { _id, url }, alt, } } | order(publishedAt desc) [0..3]` ) .then((data) => { setPosts(data); console.log(data); }) .catch(console.error); }, []); return ( <> <section id="hero" className="h-auto mt-20"> <h1 className="text-4xl font-semibold text-gray-900 text-center mb-4"> Make a Difference Today </h1> <h1 className="text-2xl font-semibold text-gray-900 text-center mb-8"> Donate for a Better Future. </h1> <div className="flex justify-center mb-20"> <img src={HeroImg} alt="car img" style={{ width: "400px" }} /> </div> </section> <section id="about" className="text-center mb-40"> <div className="flex lg:flex-row flex-col justify-center items-center m-0 lg:mr-24"> <div className="flex justify-center items-center mb-8 lg:mb-0"> <img src={WhatWeDoImg} alt="about car" className="w-11/12 text-center" style={{ width: "400px" }} /> </div> <div style={{ height: "18rem" }} className="lg:w-96 w-11/12 m-0 lg:ml-24 text-left" > <h2 className="text-2xl text-black font-semibold mb-2"> Together for a Cause </h2> <h2 className="text-2xl text-black font-semibold mb-6"> Our Work and Why It Matters </h2> <p className="font-normal text-base mb-6 text-gray-700"> Support our cause. Together, we make a lasting impact. Education, healthcare, environment, empowerment. Your contribution transforms lives. Join us, donate now, and make a difference that matters. </p> <button className="rounded-sm text-white font-normal text-base px-8 py-4" style={{ background: "#4177DC" }} > Donate now </button> </div> </div> </section> <section className="mt-8 lg:px-24 xs:px-6 mb-8 relative"> <h2 className="text-center mb-12 mt-8 text-2xl"> Urgent Donation Needs </h2> <div className="mx-8"> <div className="grid lg:grid-cols-2 md:grid-cols-2 sm:grid-cols-1 gap-8"> {posts.map((postItem) => { return ( <div id={postItem.slug.current} className="p-2" style={{ backgroundColor: "rgb(231, 231, 231)", height: "350px", }} > <div style={{ height: "12rem" }}> <img className="h-48 w-full" style={{ objectFit: "cover" }} src={postItem?.mainImage.asset.url} alt="product image" /> </div> <p className="text-center py-4 font-semibold"> {postItem?.title} </p> <div className="text-center"> <Link className="underline" to={`/donate/${postItem?.slug.current}`} > See more </Link> </div> </div> ); })} </div> <div className="underline flex justify-end items-center w-full mt-20"> <Link to="donation-list">See Full list→ </Link> </div> </div> </section> <section className="flex flex-col lg:px-8 xs:px-4 align-center justify-center mb-20"> <form> <h2 className="mt-40 text-center font-semibold text mb-1 text-2xl"> Subscribe to our newsletter </h2> <p className="text-center mb-4"> Stay informed about our upcoming events! Join our community and make a difference today. </p> <div className="flex justify-center flex-col align-center"> <div className="mb-4 flex justify-center align-center"> <input class="shadow appearance-none border-0 rounded w-4/5 py-2 px-3 text-gray-700 leading-tight focus:outline-none focus:shadow-outline" id="username" type="text" placeholder="Full Name" /> </div> <div className="mb-4 flex justify-center align-center"> <input class="shadow appearance-none border-none rounded w-4/5 py-2 px-3 text-gray-700 leading-tight focus:outline-none focus:shadow-outline" id="username" type="text" placeholder="Email" /> </div> </div> <div className="text-center w-full mb-4"> <button class="bg-gray-800 text-white font-bold py-2 px-8 mx-4 rounded"> Subcribe </button> </div> </form> </section> </> ); }; export default Home;DonationList.jsx: Also in thepagesfolder, make a newDonationList.jsxfile and add the following content:import { useState, useEffect } from 'react' import client from "../../client" import { Link } from 'react-router-dom' const DonationList = () => { const [posts, setPosts] = useState([]); useEffect(() => { client.fetch(`*[_type == "post"] { title, slug, description, publishedAt, mainImage { asset -> { _id, url }, alt, } } | order(publishedAt desc)`).then((data) => { setPosts(data) console.log(data) }).catch(console.error); }, []); return ( <section className="mt-8 lg:px-24 xs:px-6 mb-12"> <h2 className="text-center mb-12 mt-8 text-2xl">Urgent Donation Needs</h2> <div className="mx-8"> <div className="grid lg:grid-cols-2 md:grid-cols-2 sm:grid-cols-1 gap-8"> {posts.map((postItem) => { return ( <div id={postItem.slug.current} className="p-2" style={{ backgroundColor: "rgb(231, 231, 231)", height: "350px", }} > <div style={{ height: "12rem" }}> <img className="h-48 w-full" style={{ objectFit: "cover" }} src={postItem?.mainImage.asset.url} alt="product image" /> </div> <p className="text-center py-4 font-semibold"> {postItem?.title} </p> <div className="text-center" > <Link className="underline" to={`/donate/${postItem?.slug.current}`} > See more </Link> </div> </div> ); })} </div> </div> </section> ) } export default DonationListDonate.jsx: This page is where the actual donation will take place. Make a newDonate.jsxfile in thepagesfolder and paste in the following content:import React from 'react' import { useEffect, useState } from 'react'; import { useParams } from 'react-router-dom'; import client from "../../client" const Donate = () => { const [singlePost, setSinglePost] = useState(); const [amount, setAmount] = useState(); const params = useParams(); const slug = params.slug; useEffect(() => { client.fetch(`*[slug.current == "${slug}"] { title, slug, body, description, publishedAt, mainImage { asset -> { _id, url }, alt, }, "name": author->name, }`).then((data) => { setSinglePost(data[0]) console.log(data[0]) } ).catch(console.error) }, [slug]) return ( <div className="mt-20 flex justify-center align-center mb-20"> <div className="flex flex-col lg:flex-row justify-center lg:items-start items-center align-center bg-gray-300 py-8 px-4" style={{width: "75%"}}> <div className="items-center"> <img style={{width:"500px"}} alt={singlePost?.title} src={singlePost?.mainImage.asset.url} /> </div> <div> <div className="flex justify-center items-center lg:justify-start align-center lg:items-start flex-col"> <h5 className="mb-4 text-center lg:text-left lg:ml-4 text-xl font-semibold">{singlePost?.title}</h5> <p className="mb-8 text-center lg:text-left lg:ml-4">{singlePost?.description}</p> <input required type="text" value={amount} onChange={(e)=> setAmount(e.target.value)} placeholder="Input an amount" style={{ border: "1px solid rgb(107, 114, 128)" }} className="mb-6 text-center w-52 py-3 mb-2 mx-4 rounded bg-transparent text-sm outline-0" /> <button class="bg-gray-600 text-center hover:bg-blue-700 w-40 text-white font-bold py-2 mx-4 rounded"> Donate now </button> </div> </div> </div> </div> ) } export default Donate
Step 6: Register the Frontend Pages:
In this section of this article, we are going to enable client-side routing in our application using React Router.
main.jsx is our entry point, so we will import BrowserRouter and wrap the App component within it.
Open main.jsx and replace it with the following content:
import React from 'react'
import ReactDOM from 'react-dom/client'
import App from './App.jsx'
import { BrowserRouter } from 'react-router-dom'
import './index.css'

ReactDOM.createRoot(document.getElementById('root')).render(
  <React.StrictMode>
    <BrowserRouter>
    <App />
    </BrowserRouter>
  </React.StrictMode>,
)
That's it! you can now register the three pages. Open App.jsx and replace it with the following content:
import { useState } from "react";
import { Routes, Route } from "react-router-dom";
import Home from "./pages/Home";
import "./App.css";
import Navbar from "./components/Navbar";
import Footer from "./components/Footer";
import Donate from "./pages/Donate";
import DonationList from "./pages/DonationList";

function App() {
  const [count, setCount] = useState(0);

  return (
    <>
      <Navbar />
      <Routes>
        <Route path="/" element={<Home />} />

        <Route path="/home" element={<Home />} />
        <Route path="/donation-list" element={<DonationList />} />
        <Route path="/donate/:slug" element={<Donate />} />
      </Routes>
      <Footer />
    </>
  );
}

export default App;
Integrating BudPay into our App
BudPay is a payment gateway API that allows businesses to securely process online payments. There are two ways to accept payment with BudPay:
Inline Checkout
Standard Checkout
This tutorial will use the Standard Checkout payment method.
Step 1: Sign Up for BudPay
Before we can integrate BudPay into your app, we must first sign up for a BudPay account. You can sign up for a BudPay account on the BudPay website.
Once you have signed up for a BudPay account, you will be given access to the secret API key. This key is all we need to integrate BudPay into our app.
Step 2: Install the budpay-react Package
The budpay-react helps you seamlessly integrate BudPay payment solutions easily into your projects. Run the command below to install:
npm install budpay-react
This will install the budpay-react package and add it to our application's dependencies.
Step 3: Create BudPaymentButton.jsx Component
The BudPay integration will be set up in this component, by defining a function for initiating payments and managing responses and errors from the payment process.
Make a new BudPaymentButton.jsx file in the components folder and paste in the following content:
import BudPay from "budpay-react";

  const config = {
    secret_key: "your-secret-key",
    signature: "your-HMAC-Signature",
  };

  const budPay = new BudPay(config);

  const { acceptPayment } = budPay;

 export const paywithBudPay = async (amount) => {
    const payload = {
      email: "reuben09@gmail.com",
      amount: amount,
      callback: "yourcallbackurl",
    };
    try {
      const res = await acceptPayment.standardCheckout(payload);
      console.log(res);

      window.open(res.data.authorization_url, "_blank");
    } catch (error) {
      console.log(error);
    }
  };
Step 4: Add the Payment Button to the Donate.jsx Page
Navigate to the Donate.jsx page and put in the following snippet to import the payment button:
import { paywithBudPay } from '../components/BudPaymentButton';
Still in the Donate.jsx page find your "Donate now" button and call the paywithBudPay button:
 <button
  onClick={() => paywithBudPay(amount)}
  class="bg-gray-600 text-center hover:bg-blue-700 w-40 text-white font-bold py-2 mx-4 rounded"
>
  Donate now
</button>;
We are now ready to receive payment on our donation site!
Conclusion
In this article, I have given us a comprehensive guide on how to build a complete donation site with Sanity, BudPay and Reactjs. Here are some references that you should check out: